- Good BBQ websites.
- Meat Temperature guide
Blog
-
BBQ Information
-
Backup mysql databases with mysqldump
Addendum 2015-0318: I am now using automysqlbackup for mysql backups. It is simple to use and offers rotating daily/weekly/monthly backups. See my post at https://blog.chadchenault.com/2015/04/25/rotating-backups-of-mysql-database-with-automysqlbackup-version-3-0/.
I have multiple (five) databases in mysql and need to perform regular backups and off-site backups. I am using a python script that uses the mysqldump program to backup my databases. I am doing daily backups to my home folder at ~/Documents/backup.mysql/. My home directory is backed up daily to another hard drive with a daily cron job and using rsync to create differential backups. I plan on backing up all databases to individual files because I read that it makes restoring a single database easier than if all databases are backed up into one big file. The files will also be compressed with gzip. I did a gzip compression test using the default compression and the “-9” option (best compression) and the difference was minimal for my needs. I decided to use the default compression for speed and simplicity.
mysqldump from command line for testing
sudo mysqldump -u user --all-databases --events | gzip -c > /home/chad0320/Documents/backup.mysql/testbackup.all-databases.sql.gzReferences
1. python help using mysqldump: http://whatthehost.net/python-s3-backup-script-for-ubuntudebian-web-and-mysql-database-servers/
2. mysqldump manpage: http://manpages.ubuntu.com/manpages/saucy/man1/mysqldump.1.html
-
gedit 3.10.4 Plugins in Ubuntu 14.04
I like the gedit text editor in Ubuntu 14.04. It is simple and trivial to add new features through plugins. Below I will list the plugins I like and where to find them. I will also give some general installation instructions. Commands from the terminal look like this sentence.
- System Information
- Ubuntu 14.04 unity desktop
- gedit 3.10.4
- gedit is a small and lightweight text editor for the GNOME Desktop
- https://wiki.gnome.org/Apps/Gedit
- Plugins I have installed
- From https://wiki.gnome.org/Apps/Gedit/ThirdPartyPlugins-v3.8
- Advanced Find & Replace
- Advanced find & replace functions. Find & replace in documents.
- Installation from install script
- bash install.sh
- Control Your Tabs
- Switch between document tabs using Ctrl+Tab / Ctrl+Shift+Tab (most recently used order) and Ctrl+PageUp / Ctrl+PageDown (tabbar order).
- Installation
- cp -av controlyourtabs.py controlyourtabs.plugin ~/.local/share/gedit/plugins
- Toggle Text Wrapping
- Quickly toggle text wrapping from the View menu or Toolbar.
- Installation
- cp -avR toggletextwrapping toggletextwrapping.plugin ~/.local/share/gedit/plugins
- Advanced Find & Replace
- From https://wiki.gnome.org/Apps/Gedit/ThirdPartyPlugins-v3.0
- Favorites
- Organize your favorite documents for quick access.
- Installation
- cp -avR favorites favorites.plugin ~/.local/share/gedit/plugins
- gedit-markdown
- Syntax highlighting, snippets, external tool, color scheme and embedded HTML preview (can also be used as a Web browser) for Markdown
- I did not install this, but wanted it here to find it later
- Pylint 2
- Analyze Python source code with Pylint
- Installation
- I added Gedit BC Developer Plugins which contains Pylint
- sudo apt-add-repository ppa:gedit-bc-dev-plugins/releases
- sudo apt-get update
- sudo apt-get install gedit-developer-plugins
- Favorites
- From https://wiki.gnome.org/Apps/Gedit/ThirdPartyPlugins-v3.8
- Example Installation For Favorites Plugin
- Most plugins are installed like the “favorites” plugin. All plugins provided good documentation for installation. A few plugins provide a bash installation script making installation even easier.
- Download and extract the archive.
- https://github.com/Quixotix/gedit-favorites/archive/master.zip
- Firefox browser gives the option of downloading or extracting the archive. Choose extract the archive and choose a folder to save it to.
- From the terminal, change directory to the extracted archive location with the “cd” command
- Copy the file favorites.plugin and the folder favorites to ~/.local/share/gedit/plugins/.
- cp -avR favorites favorites.plugin ~/.local/share/gedit/plugins
- Restart Gedit.
- Activate the plugin in gedit.
- From the menu choose ‘Edit > Preferences’, select the ‘Plugins’ tab, and check the box next to ‘Favorites’
That is it. gedit comes for free from the Gnome Foundation. I appreciate everything they do and for promoting open source software. More information about gnome is here https://www.gnome.org/foundation/.
- System Information
-
Create a Multiple Resolution Favicon.ico file with a Linux Convert Command
I found these instructions for creating a multiple resolution favicon.ico file with linux convert command. A favicon.ico file is:
(short for Favorite icon), also known as a shortcut icon, Web site icon, tab icon or bookmark icon, is a file containing one or more[1] small icons, most commonly 16×16 pixels, associated with a particular Web site or Web page. https://en.wikipedia.org/wiki/Favicon.
The commands come from a user cappi2000 from this blog: http://blog.lavoie.sl/2012/11/multi-resolution-favicon-using-imagemagick.html. Code entered into the terminal will look like this sentence.
- Install imagemagick
- sudo apt-get install imagemagick
- rename your source image (with a resolution of at least 256×256 pixels and a PNG format file) to ‘favicon.png’. Replace “your.original.png” in the command with the name of your PNG file.
- cp -av your.original.png favicon.png
- Run imagemagick “convert” command
 convert favicon.png -bordercolor white -border 0 \

\( -clone 0 -resize 16x16 \) \

\( -clone 0 -resize 32x32 \) \

\( -clone 0 -resize 48x48 \) \

\( -clone 0 -resize 57x57 \) \

\( -clone 0 -resize 64x64 \) \

\( -clone 0 -resize 72x72 \) \

\( -clone 0 -resize 110x110 \) \

\( -clone 0 -resize 114x114 \) \

\( -clone 0 -resize 120x120 \) \

\( -clone 0 -resize 128x128 \) \

\( -clone 0 -resize 144x144 \) \

\( -clone 0 -resize 152x152 \) \

-delete 0 -alpha off -colors 256 favicon.ico
You will have a favicon.ico with most well-known formats stored into one file.- Reference about favicon files
- Install imagemagick
-
Encrypt Hard Drive for Secure Storage in Linux Ubuntu 14.04
I need to be able to back up my data to an external hard drive that will be stored off site to protect my data if my house burns down or the contents are stolen. I also want the data to be private, so that means an encrypted hard drive. I am using Ubuntu 14.04. This machine is on a headless server so all commands are entered from the terminal over ssh. I have incorporated all of these commands into a python backup script for ease of use.
Terminal code will look like this sentence.If you have monitor hooked up to your computer, gui tools are available.- References
- Install cryptsetup
sudo apt-get install cryptsetup
- Identify the correct hard drive to use. You will be erasing all data on the drive.
- see post https://blog.chadchenault.com/2015/01/03/identify-a-hard-drive-serial-number-in-linux-ubuntu-14-04/
- Remember the UUID of the drive from post above to use device in the following commands
- Fill the hard drive with random data. I saw arguments were this step is not required, however I felt it safer to do this and I am not in a rush. This step takes a long time.
- run command as root
sudo -s- This method is fast if CPU supports AES-NI (hardware acceleration). see http://serverfault.com/questions/6440/is-there-an-alternative-to-dev-urandom
openssl enc -aes-256-ctr -pass pass:"$(dd if=/dev/urandom bs=128 count=1 2>/dev/null | base64)" -nosalt < /dev/zero | pv -pterb > /dev/sdj
- This was another command posted but was not as fast
dd if=/dev/urandom of=/dev/sdj
- I then played a youtube playlist in the background to help generate random data
- run command as root
- Encrypt the hard drive
- http://linux.die.net/man/8/cryptsetup
- You can change type and strength of encryption with options
- from https://www.schneier.com/blog/archives/2014/04/auditing_truecr.html
sudo cryptsetup --cipher aes-xts-plain64 --key-size 512 --hash sha512 --iter-time 5000 luksFormat /dev/disk/by-uuid/2228745a-0db3-48c7-b582-5a3ddf7e7c70
- Verify the encryption is using luks
sudo cryptsetup -v isLuks /dev/disk/by-uuid/2228745a-0db3-48c7-b582-5a3ddf7e7c70- Output should be “Command successful.” if LUKS device
- Open the encrypted device (decrypt/unlock the device)
- Then first time the encrypted device is opened, a symbolic link called a “mapping” is created which becomes the name of the LUKS device.
- For example I chose a descriptive name “backup.serv-offsite” and the LUKS device will be created at /dev/mapper/backup.serv-offsite. “/dev/mapper/backup.serv-offsite” will only be created when the LUKS device is opened.
sudo cryptsetup -v luksOpen /dev/disk/by-uuid/2228745a-0db3-48c7-b582-5a3ddf7e7c70 backup.serv-offsite
- Then first time the encrypted device is opened, a symbolic link called a “mapping” is created which becomes the name of the LUKS device.
- See if the LUKS device is already unlocked/open.
sudo cryptsetup status backup.serv-offsite- output if device is opened
- /dev/mapper/backup.serv-offsite is active and is in use.
- type: LUKS1
- cipher: aes-xts-plain64
- keysize: 512 bits
- device: /dev/sde
- offset: 4096 sectors
- size: 3907025072 sectors
mode: read/write
- output if device is closed
- /dev/mapper/backup.serv-offsite is inactive.
- Create a filesystem once device is opened
mkfs.ext4 /dev/mapper/backup.serv-offsite
- Mount the filesystem
sudo mount --verbose -t ext4 /dev/mapper/media.serv-backup /media/bkup.mserv- /dev/mapper/media.serv-backup is the opened LUKS device
- /media/bkup.mserv is the location mount point of the LUKS device
- Umount the filesystem
sudo umount /media/bkup.mserv
- Close the LUKS device so that the data stays private
sudo cryptsetup -v close media.serv-backup
- Verify the LUKS device was closed, data is not available
sudo cryptsetup status backup.serv-offsite
- Done
-
Identify a hard drive serial number in Linux Ubuntu 14.04
It is very important to accurately identify a hard drive before you erase the drive or prepare the drive for encryption by writing random data over the whole drive. If you choose the wrong drive, you can loose all your data from that drive. Below are some commands to indentify your drives. I am using linux Ubuntu 14.04. All commands are entered from the terminal.
Terminal code will look like this sentence.- For the drive you are about to erase, find the serial number on the drive and record the last 5 digits (you do not need to write down the whole serial number and you will save time).
- Here are instructions for Western Digital drives. Other manufactures are similar.
- from http://wdc.custhelp.com/app/answers/detail/a_id/249/~/how-to-find-the-serial-number-of-a-wd-drive-or-product
The serial number is located on the label on the back or side of the drive. Please note that the location will vary according to the drive. It is usually proceeded by a S/N: or SN:. If the serial number is unable to be read, many customers have taken digital pictures of the label and enlarged it on their computer to make it easier to read.
- Here are google images of serial number numbers on hard drives if you are still unsure.
- show serial number in software
- List all physical devices with “blockid” command
sudo blkid- output is
- /dev/sdb: UUID=”2628745a-0db3-48c7-b582-5a3ddf7e7c70″ TYPE=”crypto_LUKS”
- Remember or copy the uuid. You can identify the device by the UUID (preferred because the UUID doesn’t change) as /dev/disk/by-uuid/2628745a-0db3-48c7-b582-5a3ddf7e7c70
- show serial number with “hdparm” command
- you have to change /dev/sdb with what is found on the above blkid command or use UUID
- Identify disk by UUID
sudo hdparm -I /dev/disk/by-uuid/2628745a-0db3-48c7-b582-5a3ddf7e7c70 | grep -e "/dev" -e "Serial Number" -e "device sizewith M = 1000"
- Identify disk by /dev/sdx
sudo hdparm -I /dev/sdb | grep -e "/dev" -e "Serial Number" -e "device sizewith M = 1000"
- output below
- /dev/sdb:
- Serial Number: WD-WCC4MKC41F22
- device size with M = 1000*1000: 2000398 MBytes (2000 GB)
- verify this serial number matches what is on the outside of the hard drive
- List all physical devices with “blockid” command
- For the drive you are about to erase, find the serial number on the drive and record the last 5 digits (you do not need to write down the whole serial number and you will save time).
-
Open a LUKS device with Python 3 script
Here code from a script to unlock a LUKS device before making a backup to the device. I use LUKS for encrypting hard drives for off-site storage.
print ("Determine if luks device mapper link exists. If link exists, then luks is open")
answer = os.path.islink(luks_location)
print ("Result of luks device being open: ", answer)

if answer == False:
    #luks device is closed, attempt to open
    print ("Attempting to open luks device: ", luks_device_uuid)
    subprocess.call("cryptsetup luksOpen " + "--key-file " + repr(luks_keyfile) + " " + repr(luks_device_uuid) + " " + repr(luks_name), shell=True)
    answer = os.path.islink(luks_location)

    # test to see if luksOpen failed and need to exit program
    if answer == False:
        # luksopen failed, exit program
        print ("luks device failed to open. The answer variable is: ", answer)
        sys.exit ("Exiting program now.")
    else:
        # luksopen was successful
        print ("luks device is now open: ", answer)
        print ("luks location is: ", luks_location)
        print ("luks device mapper name is: ", luks_name)

else:
    # luks device was already open
    print ("luks device is already open: ", answer)
    print ("luks location is: ", luks_location)
    print ("luks device mapper name is: ", luks_name)
sys.exit("exiting program")
Next blog will be mounting the device with python.
-
Linux Screen command
Use this command to start a long process while ssh into a machine to keep the process running if the ssh connection gets dropped.
http://ss64.com/bash/screen.html
- screen -r Resume a detached screen session
- Control-a ? Display brief help
- Control-a ” List all windows for selection
- Control-a d Detach screen from this terminal
- Control-a c Create new window running a shell
- screen -t backup Start a screen with title “backup”
- Control-a f Toggle flow on, off or auto
- Control-a n Switch to the Next window
- Control-a p Switch to the Previous window
- Control-a A Accept a title name for the current window
Screen Customizations
- install byobu
- sudo apt-get install byobu
- https://help.ubuntu.com/community/Byobu
-
Adding A Calander to OwnCloud and Thunderbird
Here a brief steps to add calendars to Owncloud and then Thunderbird
- Download calendar from website in ical format and save it to your hard drive
- Import Calendar into Owncloud
- Owncloud manual
- Login to Owncloud account
- goto files tab
- select a folder to import a calendar
- click on the upload arrow at the top of then page
- a new window will appear and select your ical calendar (has a .ics extension, example: US-holidays.ics)
- The new file “US-holidays.ics” should now be visible in the files tab
- click on the “US-holidays.ics” file name
- a new dialog box appears “Import a calendar file”
- at “Please choose a calendar”
- select “create a new calendar”
- type in calendar name
- choose a color for the calendar
- select the box “Remove all events from the selected calender”
- click button “import”
- at “Please choose a calendar”
- a new dialog box appears “Import a calendar file”
- Adding a Calendar to Mozilla Lightning calendar application
- https://support.mozilla.org/en-US/kb/adding-a-holiday-calendar?esab=a&s=adding+a+calendar&r=0&as=s
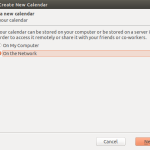
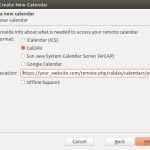
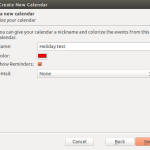
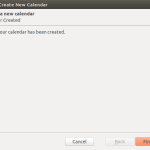
- Open Mozilla thunderbird and open the calendar tab
- from the menu select File|New|Calendar and follow the pictures below
-
jobs command linux, ubuntu 14.04
Instructions for use of the jobs command from the terminal.
To stop a running process:
$ ctrl + z
[1]+ Stopped watch -n 60 cat /proc/mdstat
List jobs with process id
$ jobs -l
[1]+ 31337 Stopped watch -n 60 cat /proc/mdstat
Kill job #1. If killing process while stopped, you will have to send the process to the foreground for it to be killed.
$ kill %1
$ fg %1
watch -n 60 cat /proc/mdstat
Check that the process is no longer running. No jobs will be listed and the output will be blank.
jobs -l
References
http://www.cyberciti.biz/howto/unix-linux-job-control-command-examples-for-bash-ksh-shell/